3D printing supports guide
3D Printing Supports Explained: Tree vs. Normal Supports, Overhangs & Easy Removal
A model can look perfectly printable in the slicer and still go wrong on the bed. An outstretched arm on a miniature sags. A horizontal bracket prints as a drooping mess. A decorative sculpture develops a rough, uneven underside that no amount of sanding fixes. The cause is almost always the same: a section of the model has nothing underneath it while the printer tries to build it in mid-air.
FDM and FFF printers build objects one layer at a time, and each new layer needs something to print onto. Most of the time that something is the layer below it. But not every surface points straight up — overhangs, bridges, and isolated features can leave the nozzle extruding plastic into empty space. That is where temporary support structures come in: extra material the slicer generates beneath those features to hold them up until the part is finished, then removed afterward.
Supports can be the difference between a print that succeeds and a print that fails, but they are not free. They add filament and print time, they can leave marks on the surface, and they have to be removed cleanly. This guide explains when prints actually need supports, how normal and tree supports differ, how the main slicer settings affect the result, and how to remove supports without damaging the part you wanted in the first place.
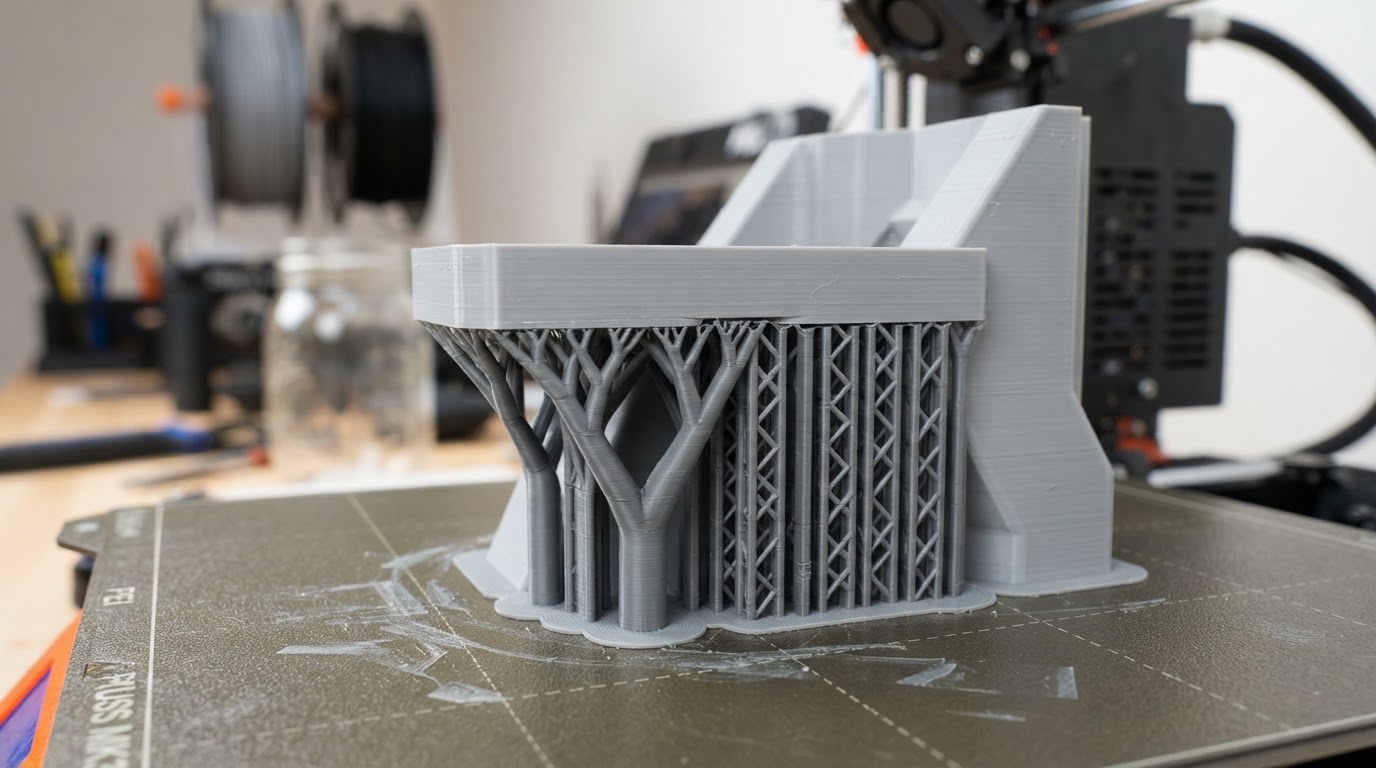
What Are Supports in 3D Printing?
Supports are temporary structures your slicer generates to hold up parts of a model that would otherwise print into thin air. When the slicer sees an overhang or an isolated feature that the printer cannot build directly on top of the layer below, it can add a scaffold of material beneath it — usually a pattern of columns, walls, or branches connected to the build plate or to the model itself. The printer builds that scaffold along with the part, and you break or peel it away once the print is done.
The key word is temporary. Supports are not part of the finished object. They exist to make an otherwise impossible geometry printable, and they are designed to be removed. That is what separates them from infill, which is the internal structure the slicer generates inside the part and which stays there. Infill gives a printed object its internal strength; supports give a printed object something to print on and then go away. If you are not clear on the difference, our 3D printing infill guide covers the internal side in detail.
Because supports are generated by the slicer rather than modeled into the part, you control them with settings. The same model can print with no supports, with a dense forest of normal supports, or with a few well-placed tree branches, depending on how you slice it. Changing the slicer — or just the support settings — changes what gets printed and what has to be removed.
Supports are a slicer-generated aid, not part of the model. They trade filament and print time for the ability to print geometries that would otherwise fail, and they always come with a cleanup cost.
Why Do 3D Prints Need Supports?
FDM printing is a layer-by-layer process. The nozzle melts filament and lays it down on top of the previous layer, and each layer fuses to the one below it as it cools. That works cleanly when each new layer sits mostly on top of solid material. It stops working cleanly when a layer has to extend out past the edge of the layer beneath it — an overhang — or when it has to span a gap with nothing underneath — a bridge.
A short overhang the printer can stick to the edge of the layer below may print fine. A large overhang, or one that tilts too far toward horizontal, has nothing to hold the freshly extruded plastic in place, so it sags, strings, or drops. A short bridge can sometimes be drawn across a gap because the filament stretches from edge to edge; a long bridge has nothing to land on and droops in the middle. Supports exist to give those features something to print onto.
Whether a given overhang actually needs support depends on more than its angle. The printer's cooling, the material, the layer height, the extrusion width, the print speed, the part geometry, and the print orientation all change how far a layer can reach out before it starts to sag. This is why a flat rule like '45 degrees always needs supports' is only a rough starting point, not a guarantee — some printers and materials handle steeper overhangs cleanly, and some struggle earlier.
- Overhangs — surfaces that tilt outward past the edge of the layer below — are the most common reason for supports. The steeper the tilt toward horizontal, the more likely support is needed.
- Bridges — horizontal spans across a gap — can sometimes print unsupported if they are short, but longer bridges sag without support or good bridging settings.
- Isolated features that start in mid-air (a hand reaching out from a figure, a protrusion with nothing beneath it) usually need support because the first layer of the feature has nothing to print onto.
- Print orientation changes everything. Rotating a part before slicing can turn an overhang into a self-supporting surface and eliminate the need for supports entirely.
- Some overhangs print fine without support because the printer can stick them to the layer edge; others fail. The only reliable way to know is to inspect the sliced preview and, where it matters, test a small print.
There is no universal overhang angle that always needs supports and no universal angle that never does. It depends on the printer, material, layer height, cooling, geometry, and orientation. Treat any angle threshold as a starting point, not a rule.
Normal Supports vs. Tree Supports
Most slicers offer two broad families of support structure, and the choice between them is one of the biggest support decisions you make. They solve the same problem — holding up overhangs — in very different ways, with different tradeoffs.
Normal Supports
Normal supports (sometimes called grid, linear, or pattern supports) build a relatively direct structure straight up from the build plate or from the model to the underside of the overhang. Think of them as columns and walls: the slicer traces a pattern of material directly beneath the feature that needs holding up, with a flat or near-flat top that meets the overhang.
Because the path from the build plate to the overhang is short and direct, normal supports tend to be stable and predictable. The tradeoff is contact area: a large flat overhang gets a large flat support structure beneath it, which can leave more marks on the surface where the support met the model and can take more effort to clean up. Normal supports also tend to use more material and add more print time on parts with big overhangs, because they fill the whole volume under the feature rather than just reaching up to it.
Normal supports are a dependable general-purpose choice and the style many slicers default to. They suit parts where stability matters more than minimizing contact, and where the supported surface is not the visible face of the part.
Tree Supports
Tree supports grow a branching structure instead of a solid block. Rather than building straight up under the overhang, the slicer generates trunks that rise from the build plate and branch outward toward the features that need support, touching the model only where a branch actually reaches an overhang. The result looks more like a tree than a scaffold.
The potential advantage is reduced contact with the model: where a normal support would put a wall under the entire overhang, a tree branch may touch only a small area. That can mean fewer surface marks on visible faces and easier removal on some geometries, especially curved or irregular ones like miniature figures and decorative objects. Tree supports can also sometimes reach over a feature to support something behind it without filling the space in between.
The tradeoffs are real. Tree supports are more complex to generate and can be less stable than a direct normal structure on some geometries, because the load travels through branches rather than straight columns. On a large flat overhang, a tree structure may not be faster or use less material than normal supports — it depends on the model. Tree supports are a strong choice for organic shapes and parts where you want to minimize contact, and a less obvious choice where raw stability under a big flat area is the priority.
Organic Supports
Organic supports are a tree-style support variant. The term is most associated with PrusaSlicer, which offers Grid, Snug, and Organic support styles; UltiMaker Cura documents Normal and Tree structures. The naming is not consistent across slicers, and the implementations are not identical — an 'organic' support in one slicer and a 'tree' support in another are related ideas, not the same menu with a different label.
Organic-style supports generally aim to combine the reduced-contact benefits of tree supports with smoother, more gradual branching that is easier to remove and leaves fewer marks. Like tree supports, they suit curved and irregular geometry well. The exact behavior — how branches form, where they contact the model, and how they handle the transition to the overhang — depends on the slicer and its settings, so check your slicer's documentation for what its specific option does rather than assuming it matches another application's.
Tree vs. Normal Supports — Comparison
| Characteristic | Normal Supports | Tree Supports |
|---|---|---|
| General structure | Direct columns or walls built straight up under the overhang. | Branching trunks that rise and spread toward the features needing support. |
| Typical geometry | Flat, block-like scaffold filling the volume beneath an overhang. | Organic, branch-like structure that reaches over and around features. |
| Contact with model | Larger, flatter contact area directly under the overhang. | Smaller, localized contact where branches reach the model. |
| Material consumption | Often higher on large overhangs because the full volume is filled. | Can be lower on some geometries; depends on the model and settings. |
| Print time | Often longer on large overhangs due to the volume of support printed. | Can be shorter on some geometries; depends on the model and settings. |
| Stability | Generally stable and predictable thanks to the direct load path. | Can be less stable on some geometries; load travels through branches. |
| Removal considerations | Larger contact area can mean more cleanup and more surface marks. | Reduced contact can mean easier removal and fewer marks on some shapes. |
| Common applications | Large flat overhangs where stability is the priority. | Curved, irregular, or miniature geometry where minimizing contact matters. |
Tree supports are not automatically faster, cheaper on filament, or cleaner on the surface than normal supports. Those outcomes depend on the model, the slicer, and the settings. Compare the slicer's own time and material estimates for the same model with each support style before deciding.
When Can You Print Without Supports?
Not every overhang needs support, and avoiding supports where you can saves filament, print time, and cleanup. The question is which overhangs your printer and material can handle cleanly on their own — and that is something the sliced preview and a small test print answer far better than any rule of thumb.
Self-supporting geometry is the easiest case. Surfaces that tilt only gently from vertical can often print without support because each layer sits mostly on the layer below. Chamfers and angled transitions can turn what would be a sharp horizontal overhang into a gentler slope the printer can handle. Short bridges can sometimes span a gap by stretching from edge to edge, especially with cooling tuned for bridging.
Orientation is the most powerful support-avoidance tool you have. Rotating a part before slicing can turn a problematic overhang into a self-supporting surface, move a bridge to a place where it prints cleanly, or put a flat face on the build plate. A simple bracket with a horizontal arm, for example, may need supports printed flat but print support-free if you stand it on its edge — though that same rotation can change the part's strength along the layer lines, its surface finish, and its dimensional accuracy on critical faces.
- Self-supporting angles — gentle overhangs the printer can stick to the layer edge — often need no support.
- Chamfers and fillets can replace a sharp overhang with a slope the printer can handle.
- Short bridges may print unsupported; long bridges usually sag without support or bridging settings.
- Reorienting the part can move overhangs to self-supporting positions, often eliminating supports entirely.
- Splitting a model into parts that print separately and are assembled afterward can avoid supports that would otherwise be unreachable inside a single piece.
Avoiding supports is not always the most important goal. A rotation that removes supports can also weaken the part along the layer lines, worsen a visible surface, or reduce accuracy on a critical dimension. Weigh support avoidance against strength, surface finish, and dimensional needs — do not chase zero supports at the cost of a part that does not work.
Understanding Support Settings in Your Slicer
Most slicers expose a handful of support settings that control when supports appear, where they appear, and how they connect to the model. The exact names and menus differ between PrusaSlicer, OrcaSlicer, UltiMaker Cura, Bambu Studio, and others, but the ideas are the same. These are the settings beginners encounter most.
Support Overhang Angle
This threshold tells the slicer when to start adding supports. Set it low and the slicer supports gentler overhangs; set it high and it only supports near-horizontal surfaces. The interpretation of the angle and the exact behavior can differ by slicer, so there is no universal number that is right for every printer and material. Start with your slicer's default and adjust based on what the preview shows and how your test prints turn out.
Support Placement
Placement controls where supports are allowed to grow. 'Build plate only' (or equivalent) generates supports only from the bed up, which is simpler and easier to remove but cannot support overhangs that sit above other parts of the model. 'Everywhere' (or equivalent) also generates supports anchored to the model itself, which can hold up interior overhangs but can be harder to reach and remove. The available options and their names differ by slicer.
Support Density
Density controls how tightly the support pattern is printed. Denser supports are more stable and hold up heavier overhangs better, but they use more filament, take longer, and can be harder to separate from the model. Sparse supports use less material and are easier to remove but may not hold up a large or heavy overhang. This is the density of the support structure itself — it is separate from the infill density of the printed part.
Support Interface
The interface is the dense layer or layers the slicer prints between the support and the model so the overhang prints on a smoother surface rather than directly on the sparse support pattern. A support roof or interface can improve the underside quality of an overhang, but a denser interface also means more contact and can make supports harder to remove. The tradeoff is between underside finish and removal difficulty.
Support Z Distance
Z distance is the vertical gap the slicer leaves between the top of the support and the bottom of the model. A larger gap makes supports easier to remove but can leave a rougher underside; a smaller gap improves the underside finish but can fuse the support to the model and make removal harder. The right value depends on the material, layer height, slicer, and support configuration — there is no universal number, so start with your slicer's default and adjust based on results.
Support XY Distance
XY distance is the horizontal gap between the support and the model's walls. More clearance makes supports easier to separate and less likely to mark vertical surfaces; less clearance puts the support closer to the overhang so it holds it up more effectively. Like Z distance, it is a tradeoff between effective support and clean separation, and the best value depends on the material and slicer.
Support Blockers and Enforcers
Blockers and enforcers let you manually control where supports appear — adding supports where the slicer did not, or removing them where it did but you do not want them. This is useful for keeping supports off a visible face or adding a single support under a stubborn feature. The names and workflows vary between slicers, so check your slicer's documentation rather than assuming the controls match another application's.
These settings interact. A dense interface with a small Z distance gives the smoothest underside but the hardest removal; a sparse support with a larger Z distance is easy to remove but may leave a rougher surface. Use the sliced preview to see the effect of each change before you print, and start from your printer and material manufacturer's recommended profiles rather than copying settings from an unrelated machine.
How to Choose Support Settings
A simple workflow keeps the decisions in order. Not all slicers use identical controls or names, but the same logic applies across PrusaSlicer, OrcaSlicer, UltiMaker Cura, Bambu Studio, and similar software.
- Examine the model's geometry and identify the overhangs and bridges that may need support.
- Consider changing the print orientation first — a rotation can eliminate the need for supports entirely.
- Choose a support style (normal or tree/organic) based on the geometry and which surfaces need to stay clean.
- Select support placement (build plate only or everywhere) based on where the overhangs sit.
- Review the overhang angle threshold so supports appear where you actually need them.
- Review the interface and Z distance settings to balance underside finish against ease of removal.
- Generate the sliced preview and inspect exactly where supports will appear.
- Compare the slicer's estimated material use and print time for this configuration.
- Adjust based on the preview — add blockers where supports land on a visible face, or enforcers where a feature still needs help.
- Print a small or low-stakes test before committing settings to a long or important print.
The sliced preview is the essential step. It shows the actual support structure, where it contacts the model, and the time and material estimates for your specific part — guessing from the settings alone is how supports end up in the wrong place or a print runs twice as long as expected.
How Supports Affect Print Quality
Supports solve a geometry problem and create a surface problem. Wherever a support touches the model, it can leave a mark — a rough patch, a shiny spot, or a small scar where the support was peeled away. Managing that tradeoff is most of the practical work of using supports.
- Surface marks where supports contacted the model are the most common quality cost. Denser contact and smaller Z gaps tend to leave more visible marks.
- Rough undersides on overhangs can happen when the support interface is too sparse or the Z distance too large for the material to bridge cleanly.
- Sagging overhangs usually mean the support was too sparse, too far away, or missing where it was needed — the feature was not actually held up.
- Supports that detach during printing can ruin a part, because the overhang they were holding collapses mid-print.
- Post-processing — light sanding, filling, or trimming — is often needed on supported surfaces even when removal went well.
Support settings balance competing goals. A support that is very easy to remove may not hold the overhang up well enough; a dense support with a tight interface may give a clean underside but be hard to separate. There is no single setting that is both easiest to remove and best at supporting — you trade one against the other based on what the part needs.
How Supports Affect Print Time and Material Use
Adding supports means printing more material and doing more travel, so a supported print generally uses more filament and takes longer than the same print without supports. How much more depends on the support volume, the pattern, the interface layers, and how much of the model actually needs holding up.
The difference between normal and tree supports on time and material is not fixed. On a part with a large flat overhang, normal supports may fill the whole volume beneath it and use more filament; on a part with a few small isolated features, tree supports may reach up with branches and use less. On other geometries the comparison reverses. The only reliable way to compare is to slice the same model both ways and read the slicer's time and material estimates for each.
This is why the preview matters as much as the settings. The slicer knows the exact geometry, the support style, the density, and the interface, and it estimates both the print duration and the filament weight for that specific combination. Comparing those estimates between configurations tells you the real cost of one support choice over another — a generic rule about tree supports using less material is not reliable across every model.
A faster, sparser support is not automatically a worse result, and a slower, denser support is not automatically better. Match the support to what the overhang actually needs, and let the slicer's estimates show you the real time and filament tradeoff for your specific part.
How to Remove 3D Printing Supports
Removing supports is a physical post-processing step, and the right approach depends on the support style, the material, and how the supports were configured. The general principles are the same: work carefully, protect the part, and stop before you damage the surface you were trying to preserve.
Let the print cool before removing supports. Working on a hot part can deform the model or the support interface and make removal harder. Once the part is at room temperature, identify where the supports contact the model and start with the supports that are easiest to reach and least likely to mark a visible face.
- Let the print cool to room temperature before removing supports; a warm part deforms more easily.
- Follow the material and printer manufacturer's guidance for handling and post-processing the filament you used.
- Identify the support contact points and remove the most accessible supports first, working toward the harder ones.
- Protect delicate features — thin walls, small protrusions, and fine details can break when a nearby support is pulled away.
- Use appropriate hand tools where needed, such as flush cutters or pliers suited to the support material, and keep hands clear of sharp tool ends.
- Wear eye protection when snapping or cutting supports, especially rigid ones that can fly loose.
- Avoid excessive force — if a support will not release, re-examine the contact rather than pulling harder and risking the model.
- Inspect the finished surface after removal and do any light cleanup — trimming stray strands or lightly sanding a rough patch — before calling the part done.
Removal methods differ between materials and support systems. Do not heat, melt, or chemically treat supports without verified, material-specific guidance, and do not assume a method that works for one filament is safe for another. Follow the manufacturer's guidance for the specific material and support you used.
Breakaway vs. Soluble Support Materials
Most FDM prints use the same filament for the part and the supports, and you remove the supports mechanically by snapping or cutting them away. Some setups use a dedicated support material instead. Breakaway support materials are designed to separate from the model more cleanly than same-material supports, leaving fewer marks and making removal faster on parts where supports are hard to reach.
Soluble support materials dissolve in water or a specific solvent after the print is done, which is useful for supports trapped inside a part where you cannot reach them mechanically. Soluble supports generally require a printer that can switch materials during a print (a multi-material system) and often a separate wash or soak step, and some soluble materials are sensitive to moisture and need careful storage and handling.
Not every printer can use soluble or breakaway supports — they depend on multi-material hardware, compatible extruders, and slicer support for the material. If your printer is single-material, same-material supports with good settings are the practical option. Do not dissolve support materials in a household sink or drain, and do not assume a solvent is safe to pour away; follow the material manufacturer's handling and disposal guidance and your local disposal rules.
Soluble and breakaway supports are tools for specific problems — trapped supports, difficult surfaces, or multi-material production — not upgrades every printer needs. For most beginners, same-material supports with well-chosen settings handle the majority of prints, and the extra equipment and handling of soluble materials is not necessary.
Common 3D Printing Support Problems
A few support problems account for most failures. These are the usual causes and what to check, kept general and consistent with official slicer documentation — not universal settings.
| Problem | Possible Cause | What to Check |
|---|---|---|
| Supports are difficult to remove | Support Z distance too small, or support fused to the model. | Increase the Z gap slightly within the material's working range and review the interface density. |
| Rough surface after removal | Support interface too sparse, or Z distance too large for the material. | Add or densify the support interface and reduce the Z gap to bring the support closer to the overhang. |
| Supports detach during printing | Supports too sparse or poorly anchored to the build plate. | Increase support density, improve bed adhesion, or add a brim to the support base. |
| Overhangs sag despite supports | Support too far from the model, or too sparse to hold the feature up. | Reduce XY distance, increase density, or add an enforcer under the sagging feature. |
| Too much support material | Overhang angle threshold set too low, supporting gentle angles unnecessarily. | Raise the overhang angle threshold and re-check the preview for where supports appear. |
| Supports appear in unwanted areas | Placement set to everywhere, or no blockers used on visible faces. | Switch to build-plate-only placement where possible, or add support blockers on faces you want clean. |
| Supports fail to reach necessary geometry | Build-plate-only placement cannot reach an interior overhang. | Allow supports everywhere for that feature, or reorient the part so the overhang is reachable. |
| Thin support branches collapse | Tree or organic branches too thin for the material or print speed. | Increase branch diameter or density, or slow the print for the support structure. |
Common Beginner Mistakes
Most support mistakes come from treating supports as something to switch on and forget, rather than something to configure for the specific part. These are the common ones to avoid.
- Automatically enabling supports everywhere. Defaulting to supports on every print adds filament, time, and cleanup for overhangs that would have printed fine without them.
- Ignoring print orientation. A rotation can often remove the need for supports entirely, and it is usually faster than printing and cleaning up supports.
- Assuming every overhang requires supports. Gentle overhangs and short bridges often print unsupported on a capable, well-tuned printer.
- Choosing tree supports for every model. Tree supports suit some geometries and not others; on a large flat overhang they may not be faster or cleaner than normal supports.
- Ignoring the support interface. The interface controls the underside finish and the removal difficulty more than the support pattern does.
- Using overly aggressive removal techniques. Pulling hard or levering with sharp tools near fragile features breaks the part you were trying to protect.
- Failing to inspect the sliced preview. The preview shows where supports land and what they cost; skipping it means finding out only after a long print.
- Copying settings from an incompatible printer. Support behavior depends on the machine, material, and slicer; settings that worked elsewhere may not transfer.
- Assuming one material behaves like another. A Z distance or density that works for PLA may not work for PETG or ABS; adjust per material.
Frequently asked questions
Final Thoughts
Supports are a tool for solving a specific geometry problem, not a setting you switch on for every print. The best support strategy depends on the model, the print orientation, the material, the slicer, the printer's capabilities, the surface quality you need, and how the supports will be removed — and on how all of those interact.
Start by asking whether the part needs supports at all. A rotation or a small design change can often remove the overhang that was about to force a forest of supports into your print. When supports are needed, choose the style and settings for the specific geometry rather than defaulting to the same configuration every time, inspect the sliced preview before you print, and begin with your printer and material manufacturer's recommended profiles rather than copying settings from an unrelated machine. Treat supports as a deliberate choice, not a habit, and they stop being a source of failed prints and rough surfaces and start being what they are: a way to print geometries that would otherwise be impossible.
Keep reading
- 3D Printing hub — all 3D-printing guides and basics
- 3D Printing Infill Explained — internal structure and strength
- 3D Printers for Beginners: what to know before buying
- FDM vs. Resin 3D Printing — which fits your projects?
- How Much Does a 3D Printer Cost?
- 3D Printer Accessories: what you actually need
- Material Compatibility Database
- Editorial Policy — how we research and publish
Digital Workshop Guide does not claim hands-on testing, ownership, or measured performance for any model, support style, or slicer setting described here. Explanations are based on FDM/FFF printing fundamentals and the published documentation of major slicing software (PrusaSlicer, OrcaSlicer, UltiMaker Cura, Bambu Studio) as of October 2026 — not on independent benchmarking. No support style is ranked or recommended as a universal winner, and no print-time, filament, or surface figure is presented as a measured result. Verify support availability and behavior in your own slicer, and follow your printer and material manufacturer's guidance for the specific filament you use.