Laser Engraving Guide
Laser Air Assist Explained: When to Use It for Cutting and Engraving
A common moment for laser beginners goes like this: you cut a small wooden shape for the first time and notice the cut edges came out dark and sooty, with a faint scorch mark spreading into the surrounding surface. Smoke residue clings to the wood around the line. Someone in a forum or a video mentions air assist as the fix, so you add an air pump and aim a stream of air at the workpiece.
Then you run a detailed engraving job — a photograph, a fine line drawing, or a batch of small name tags — using the same airflow. The result looks different from what you expected: the engraved surface is lighter or patchier in places, fine detail softens, and faint marks appear where the air blew ash or debris across the face of the material. The airflow that helped the cut seems to have changed the engraving.
The central lesson is that air assist is useful, but the correct approach depends on the operation, the machine, and the material. The same directed airflow that helps a through-cut can interfere with a delicate surface engraving. This guide explains what air assist does, when it helps, when it may be undesirable, how it differs between cutting and engraving, and how to evaluate an air-assist setup for your own laser.
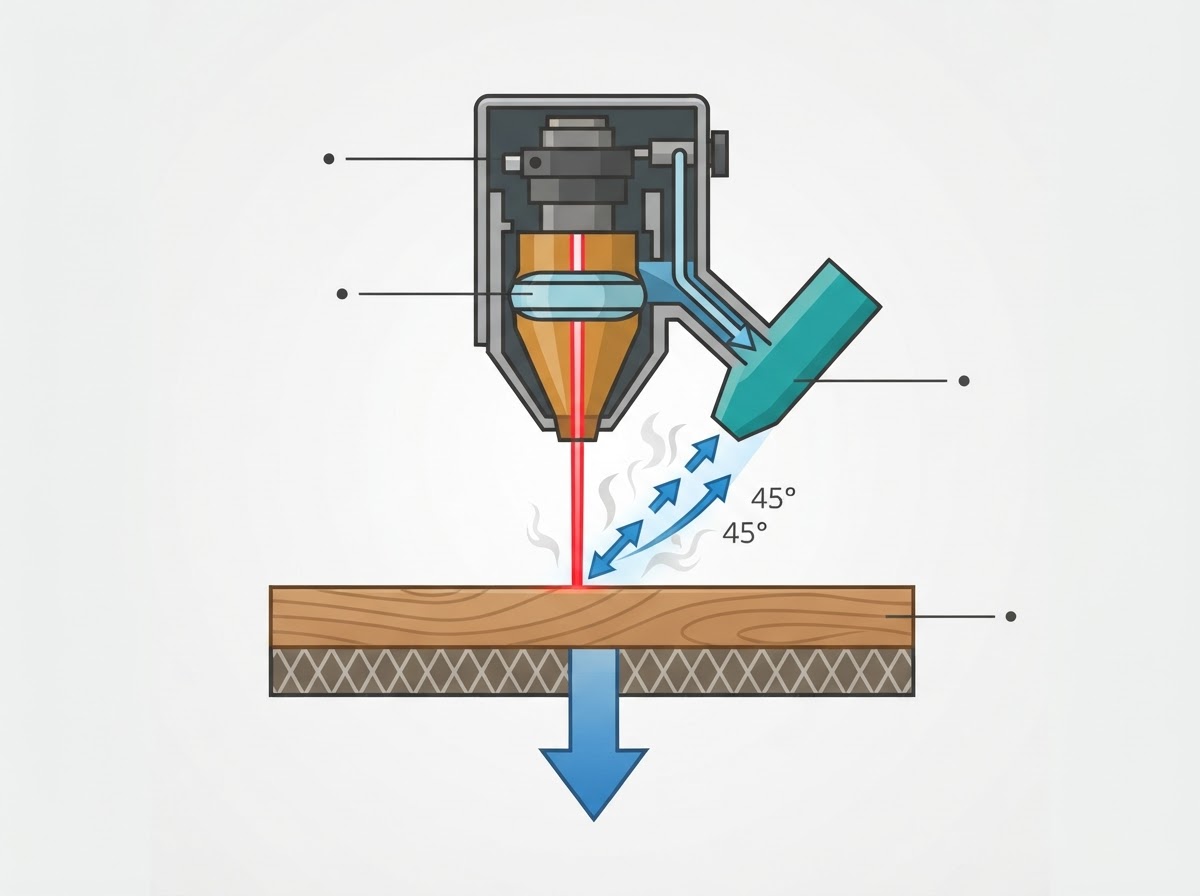
What Is Air Assist in Laser Engraving?
Air assist is a stream of air directed toward the laser's working area — the point where the beam meets the material. The air is delivered through a nozzle mounted on or near the laser head, and it is aimed at the cut or engraving zone so that it blows across the interaction point as the beam works.
A complete air-assist system is made up of a few parts working together. The air has to come from somewhere, travel through tubing, and exit through a shaped nozzle at a controlled angle. Not every machine uses the same hardware configuration: some lasers ship with air assist built in, others offer it as an official accessory, and some accept compatible third-party parts.
Air pump or compressor
The source of the airflow. Small diode lasers often use a dedicated diaphragm air pump; larger systems may use a regulated compressor. The source determines how much air is available and how steady the delivery is.
Tubing
Flexible hose that carries air from the source to the laser head. Length, routing, and fittings affect how much air actually reaches the nozzle and whether the line leaks or kinks.
Nozzle
The shaped outlet that directs the air at the working point. Nozzle position, bore size, and angle shape the airflow pattern — a narrow, well-aimed stream behaves very differently from a wide, off-target blast.
Airflow
The moving air itself. The useful quantity is the stream of air arriving at the cut, not the rated output of the pump in isolation — restrictions and routing reduce what reaches the workpiece.
Control (manual or software)
Some systems switch air on and off by hand; others are controlled by the laser software or controller so airflow can change with the operation. Control matters most when you mix cutting and engraving in one job.
How Does Laser Air Assist Work?
When the laser beam hits the material, it heats a small zone intensely. That zone produces smoke, vaporized material, and small particles. Without any airflow, that smoke tends to linger right at the cut, where it can absorb or scatter the beam, settle back onto the surface as residue, and contribute to charring at the edges.
Directed airflow changes the local conditions at that interaction point. A steady stream of air pushes smoke and debris away from the beam path, keeps the cut zone clearer, and can reduce how much hot residue settles back onto the surrounding material. In systems where the beam passes through a lens close to the workpiece, airflow can also help keep that lens cleaner by reducing how much smoke drifts upward toward the optics.
It is important to be precise about what air assist does and does not do. Air assist manages conditions at the processing point. It does not automatically improve every operation, it does not eliminate combustion or fumes, and it does not make the air around the machine safe to breathe. Those are separate concerns handled by ventilation and material choice.
Smoke removal near the cut
Airflow pushes smoke away from the beam path so it interferes less with the cut and deposits less residue nearby.
Debris clearing
Loose particles and ash are blown away from the working zone rather than settling on the freshly cut surface.
Reduced smoke accumulation
Less smoke lingering at the cut can mean less beam scattering and less heat-soaking of the surrounding material.
Lens protection (where applicable)
In systems with a lens near the workpiece, downward or angled airflow can reduce how much smoke reaches the optics.
These effects depend on the machine, the nozzle position, and the material. Air assist does not guarantee any of them on every setup.
Why Air Assist Matters for Laser Cutting
Through-cutting is where air assist tends to help most consistently. When the laser is slicing all the way through a sheet, the cut kerf produces a steady stream of smoke and vaporized material. Without airflow, that smoke sits in and above the cut, absorbing beam energy that should be reaching the bottom of the material and settling as dark residue on the edges.
Directing air at the cut helps clear that smoke so the beam reaches the material more directly, manages the residue that would otherwise stain the cut edges, and can reduce the surface charring that spreads outward from the line. For wood in particular, the difference between a cut with and without air assist is often visible in how dark and sooty the edges and surrounding surface come out.
Smoke clearance
Keeping smoke out of the beam path so more energy reaches the material rather than heating the air above it.
Cutting consistency
A clearer beam path tends to produce more consistent cutting along the length of a line, with less variation from smoke buildup.
Reduced surface staining
Less smoke settling on the surrounding material means fewer dark smudges around the cut.
Reduced charring in some materials
Managing heat and residue at the cut can reduce how far charring spreads into wood and similar materials.
Debris removal
Loose ash and particles are blown away from the cut rather than redepositing on the workpiece.
Lens protection in applicable systems
Where the optics sit close to the work, airflow can reduce smoke reaching the lens.
Cutting plywood is a practical example. A through-cut in birch plywood without air assist often leaves dark, sooty edges and a brown scorch halo spreading into the face veneer. With appropriate airflow aimed at the cut, the edges typically come out cleaner and the surface staining is reduced. The improvement is in the appearance and consistency of the cut — air assist does not let a given laser cut dramatically thicker material than its power allows.
Do You Need Air Assist for Laser Engraving?
Engraving is where the simple advice breaks down. The airflow that helps a through-cut can work against a surface engraving, because engraving is a different operation with different goals.
Through-cutting wants the beam to penetrate completely and cares mostly about the cut edges. Surface engraving wants controlled, even removal or marking across a face, and it cares about the appearance of the whole engraved area. A strong blast of air aimed at an engraving can blow loose ash and debris across the surface, disturb fine detail, and in some cases lighten or patch the engraved mark by changing how heat and residue behave.
Different engraving operations have different sensitivities. A deep raster fill behaves more like light cutting and may tolerate or benefit from some airflow. A shallow photo engraving or a fine line engraving is more easily affected by debris being blown across the face. Vector line engraving sits somewhere between, depending on how aggressive the line is.
Surface engraving
Marking or shallow removal across a face. Appearance of the whole engraved area matters, so debris blown across the surface is a concern.
Raster engraving
The head sweeps back and forth burning a grid of pixels. Fine raster detail and even shading are sensitive to airflow disturbance.
Vector engraving
Following a line at lower power than a cut. Behaves between surface marking and light cutting depending on depth.
Through-cutting
Penetrating entirely through the material. Cares about the cut edges and clearing the kerf, where airflow usually helps.
Airflow levels at a glance
No airflow
Air assist off entirely. Some machines recommend this for certain engraving jobs, but only where the optics do not require continuous air for protection.
Low airflow
A reduced stream that clears some smoke without blasting debris across the surface. Some systems support a low setting for engraving.
High airflow
Full airflow aimed at the working point. Typically suited to through-cutting, where clearing the kerf is the priority.
Automatically controlled airflow
Software or controller adjusts airflow by operation — high for cut layers, low or off for engrave layers — within a single job.
Do not treat 'turn air assist off for engraving' as universal advice. Some machines require continuous low-level airflow to protect the optics regardless of the operation, and some systems support automatic low airflow during engraving. Follow the machine-specific manufacturer guidance for your exact model and configuration.
Air Assist for Cutting vs. Engraving
The table below summarizes how airflow considerations differ across common operations. It is a framework for thinking about your own jobs, not a universal settings chart — appropriate airflow always depends on your machine, material, and manufacturer guidance.
| Operation | Typical Airflow Consideration | Potential Benefit | Important Limitation |
|---|---|---|---|
| Wood cutting | Higher airflow aimed at the cut | Cleaner edges, less surface charring, clearer beam path | Does not let a laser cut beyond its power; fire risk remains |
| Wood surface engraving | Often reduced or off, per machine guidance | Less debris blown across the engraved face | Some machines need continuous low air for optics; follow manufacturer docs |
| Photo engraving | Typically low or off for fine detail | Preserves fine dithering and even shading | Strong airflow can scatter ash and lighten or patch the image |
| Acrylic cutting | Airflow per machine and material guidance | Can help manage flame-polished edge quality and fumes | Acrylic fumes and fire behavior need ventilation; verify material is laser-safe |
| Paper / cardboard processing | Cautious, often low airflow | Reduces edge charring on thin stock | High flammability; airflow can affect flame behavior; never leave unattended |
| Detailed line engraving | Low or off, depending on optics | Crisper line definition, less debris scatter | Optics protection may require some airflow on certain machines |
Some materials introduce additional fire or fume concerns. Only process materials confirmed appropriate for your laser type, and never process unknown materials or materials such as PVC that release hazardous fumes.
Air Assist for Diode Lasers
Desktop diode lasers are the most common entry point, and their air-assist configurations vary widely. Some diode machines include an integrated air-assist system with a pump and nozzle designed for that head. Others ship without it and offer an official air-assist accessory, or accept a compatible third-party nozzle and pump combination.
Because diode laser heads are often open and the lens sits relatively close to the workpiece, airflow can matter both for cut quality and for keeping smoke away from the optics. But the right amount and aim depend on the specific head design — a nozzle meant for one machine may not fit or aim correctly on another.
Avoid universal compatibility claims. An air-assist accessory that works well on one diode laser may not fit the mounting points, clear the lens, or aim correctly on a different model. Verify compatibility with your exact machine before buying or installing any accessory, and follow the manufacturer's installation and operating instructions.
Air Assist for CO2 Lasers
CO2 laser systems more commonly include integrated air assist as part of the machine. The nozzle is typically built into the head assembly, and air delivery is controlled by the machine or its software. Because CO2 machines often cut thicker and more varied materials, airflow is usually treated as a standard part of the cutting setup.
CO2 systems may have different air requirements from desktop diode systems. The beam delivery path, lens protection, and nozzle arrangement are different, and the appropriate airflow for a given material and thickness comes from the machine manufacturer's guidance rather than from a generic number.
Do not assume that every CO2 machine uses the same pressure or airflow. Two CO2 lasers of similar power can have different nozzle designs, different air sources, and different recommended settings. Always consult the documentation for your specific machine and material.
Air Pumps vs. Air Compressors
The source of the airflow matters as much as the nozzle. Dedicated laser air pumps and compressor-based systems behave differently, and the wrong source can introduce problems that a nozzle cannot fix.
| Factor | Dedicated Laser Air Pump | Compressor-Based System |
|---|---|---|
| Airflow capacity | Steady, moderate flow suited to small nozzles | Higher potential flow; must be regulated down to suit the nozzle |
| Pressure | Lower pressure, generally simple to manage | Higher pressure; requires a regulator and careful setting |
| Noise | Typically quieter, suitable for a home workshop | Often louder, with intermittent tank refill cycles |
| Compatibility | Usually matched to a specific machine or accessory | More flexible but requires correct fittings and regulation |
| Filtration | Generally delivers clean air by design | Needs filtration to remove particulates before the nozzle |
| Moisture | Minimal moisture concerns | Can introduce moisture; a water trap may be required |
| Oil contamination | Oil-free by design in most laser pumps | Oil-lubricated compressors can pass oil into the air line |
| Maintenance | Low; mostly keeping tubing and nozzles clear | Draining tanks, checking filters, and regulator upkeep |
Pressure and airflow are different measurements. A higher pressure rating does not automatically make a system better — what reaches the cut is the airflow through the nozzle, which depends on the whole path. Unsuitable compressors or contaminated air can introduce moisture or oil that damages optics, nozzles, or the workpiece. Do not improvise high-pressure connections; use fittings and regulation appropriate to the equipment.
Understanding Airflow and Pressure
A common confusion is treating the pump's rated specification as the airflow at the cut. It is not. Air has to travel from the source, through tubing and fittings, and out through a nozzle, and every restriction along that path reduces what actually arrives at the working point.
Airflow volume is how much air moves through the system; pressure is how hard that air is pushed. A small nozzle restricts flow, so a pump rated for high flow can deliver much less at the nozzle than its spec suggests. Nozzle bore, angle, and distance from the workpiece all shape the stream that reaches the material.
This is why the specifications of the pump alone do not fully describe airflow at the cutting point, and why two setups with the same pump can behave differently. Appropriate specifications — flow, pressure, and nozzle configuration — must come from the actual equipment manufacturer for your specific machine and accessory, not from a generic chart.
Does Air Assist Reduce Laser Charring?
Charring is the dark, burned discoloration that appears on materials — especially wood — when heat from the laser affects the surrounding material. It is one of the most common reasons beginners add air assist, and airflow can reduce some forms of surface discoloration by managing smoke and heat at the cut.
But charring is not caused by airflow alone, and it is not fixed by airflow alone. How much a material chars depends on a combination of factors, and changing the airflow changes only one of them.
- Laser power — more power delivers more heat to the surrounding material
- Travel speed — slower passes dwell longer and transfer more heat
- Material — different woods and plywoods char differently
- Focus — an out-of-focus beam spreads heat over a wider area
- Number of passes — repeated passes add cumulative heat
- Adhesives in plywood — glue lines can char and smoke differently from the wood itself
- Airflow delivery — how well the nozzle clears smoke and manages heat at the cut
Airflow can reduce some charring by clearing smoke and managing conditions at the cut, but it does not solve every charring problem. If charring persists, the cause may be power, speed, focus, or the material itself — not a lack of air.
Air Assist vs. Laser Ventilation
This is one of the most important distinctions to get right. Air assist and ventilation are two different functions, and one does not replace the other.
Air assist
Directed airflow near the processing point — a small, targeted stream that manages conditions right where the beam meets the material.
Ventilation
Removing or appropriately filtering smoke and fumes from the work area as a whole — exhaust to the outside or a certified filtration system sized to the machine and materials.
Air assist moves smoke around at the cut. Ventilation removes that smoke from the room. Blowing smoke away from the cut point does not make the air safe to breathe — it just relocates it, and without exhaust the smoke still accumulates in the work area.
An enclosed laser still requires appropriate fume management. The enclosure contains light and debris; it does not make exhaust optional. Cutting and engraving produce smoke and fumes that must be vented outside or passed through a certified filtration system appropriate for the materials you process.
Air assist does not replace exhaust ventilation. Do not treat blowing smoke away from the cut as a substitute for proper fume removal, and do not use improvised exhaust shortcuts. Follow your machine manufacturer's ventilation requirements and the safety guidance for the specific materials you process.
Does Air Assist Prevent Laser Fires?
Directed airflow may reduce some local flare conditions in certain cutting operations by managing heat and clearing combustible residue at the cut. That is a real effect, but it is narrow and it is not the same as fire suppression.
A laser is an intense heat source and an ignition source. Air assist does not eliminate ignition risk. Some materials remain highly flammable regardless of airflow, and in some cases airflow can affect how combustion behaves rather than preventing it.
- Air assist is not fire suppression and does not make a laser fireproof.
- It does not eliminate ignition risk, especially with flammable materials like paper, cardboard, and certain woods.
- Airflow can affect combustion behavior at the cut, which is not the same as preventing it.
- Some materials remain highly flammable and require close supervision regardless of air assist.
- Equipment must never be left running unattended.
- Keep suitable fire-response equipment available according to manufacturer and workplace guidance.
Never leave a running laser unattended. Follow manufacturer instructions, use appropriate enclosures and safeguards, maintain proper ventilation, and keep suitable fire-response equipment available. Air assist is a processing aid, not a safety system.
How to Know Whether Your Laser Needs Air Assist
A beginner-friendly workflow for evaluating air assist for your own setup. This is a research and decision process, not an installation guide — follow manufacturer-approved procedures for any physical setup.
- Identify the exact machine model: Start with your specific laser make and model. Air-assist options and requirements differ between machines, even similar-looking ones.
- Check manufacturer documentation: Read the manufacturer's documentation for your machine. Note whether air assist is included, offered as an accessory, or supported with specific parts.
- Identify the material: Confirm the material you intend to process and that it is appropriate and safe for your laser type.
- Determine whether the job is cutting or engraving: Cutting and engraving have different airflow considerations. Know which operation a given job involves before deciding on airflow.
- Review machine-specific requirements: Check whether your machine requires continuous airflow for optics protection, regardless of the operation.
- Check whether air assist is included: If your machine includes air assist, learn how it is configured and controlled. If not, determine whether an official accessory exists.
- Verify accessory compatibility: If considering an accessory, confirm it fits your machine's mounting points, clears the optics, and aims correctly. Do not assume universal compatibility.
- Confirm ventilation requirements: Air assist does not replace ventilation. Confirm your exhaust or filtration is appropriate for the materials you process.
- Review software control options: Check whether your software or controller can switch or adjust airflow by operation, which matters most for jobs mixing cutting and engraving.
- Follow manufacturer-approved settings: Use the airflow settings and procedures the manufacturer documents for your machine, material, and operation. Do not improvise.
This is a decision framework, not an installation manual. For any physical setup, follow the manufacturer's installation and operating procedures for your specific machine.
Automatic vs. Manual Air Assist
Air-assist systems differ in how airflow is controlled. The simplest systems are manual: a switch turns the air on or off, and the operator decides when to use it. Adjustable systems add a valve or setting that changes how much air flows. Software-controlled systems tie airflow to the job, so the controller can switch or adjust air by layer or operation.
Automatic control matters most when a single job mixes cutting and engraving. A software-controlled system can run high airflow on cut layers and low or no airflow on engrave layers without manual intervention, which is convenient and reduces the chance of running the wrong airflow for an operation.
Manual on/off
A switch controls air. The operator turns it on or off per job. Simple, but requires attention when mixing operations.
Adjustable airflow
A valve or setting changes flow level. Allows tuning between full and low airflow, still typically set by hand.
Software-controlled
The laser software or controller switches or adjusts air by layer or operation within a job.
Automatic cutting/engraving modes
Some systems automatically select airflow behavior based on whether a layer is a cut or an engrave.
Not every controller or software package supports automatic air-assist control. Verify software-specific statements against the current documentation for your exact software version and machine.
Common Air Assist Problems
A troubleshooting reference for symptoms that can relate to air assist. Symptoms have multiple possible causes — use this to narrow down what to check, not to diagnose from a single symptom. Do not bypass safety interlocks or modify electrical systems; use manufacturer-approved inspection and maintenance.
| Symptom | Possible Causes | What to Check |
|---|---|---|
| Excessive engraving discoloration | Airflow too high for the engraving operation; debris blown across the surface; wrong operation setting | Whether manufacturer guidance recommends reduced or no air for engraving on your machine; software air settings per layer |
| Dark cut edges | Insufficient airflow at the cut; nozzle misaligned; smoke not clearing the kerf | Nozzle aim and condition; airflow level per manufacturer guidance; tubing for kinks or leaks |
| Smoke residue on the workpiece | Airflow too weak or poorly aimed; nozzle blocked; ventilation not removing smoke from the area | Nozzle for obstruction; airflow delivery; whether exhaust ventilation is adequate and running |
| Weak airflow | Kinked tubing; loose fitting; blocked nozzle; pump or compressor issue; restriction in the line | Full air path from source to nozzle for restrictions, leaks, and blockages; pump or compressor condition |
| Inconsistent cutting | Airflow varying along the cut; smoke buildup; focus or speed settings; material variation | Steadiness of airflow; whether smoke clears consistently; focus and speed per manufacturer guidance |
| Unexpected debris accumulation | Airflow blowing debris onto the surface rather than away; nozzle angle; ventilation not clearing the area | Nozzle angle and aim; whether airflow directs debris away from the workpiece; exhaust ventilation |
| Nozzle obstruction | Residue buildup in the nozzle; debris drawn into the line; lack of filtration on a compressor | Nozzle for buildup; air line filtration; manufacturer-approved cleaning procedure |
| Excessive noise | Compressor refill cycles; vibration in tubing or fittings; pump wear | Source type and mounting; fittings and tubing for vibration; whether the source is appropriate for the setup |
| Airflow not activating | Switch or software setting off; controller not triggering air; wiring or connection issue | Air switch and software settings; controller configuration; connections per manufacturer documentation |
| Moisture or contamination concerns | Compressor introducing moisture or oil; missing water trap or filter; humid environment | Water trap and filtration on the air line; source type; manufacturer guidance on air quality |
Changing one variable can affect other cutting conditions. Adjust one thing at a time and recheck results. For anything beyond inspection, use manufacturer-approved maintenance.
Common Beginner Mistakes
Mistakes that cause air assist to underperform or cause new problems. Focus on understanding over settings.
Assuming more airflow is always better
Higher airflow helps cutting but can harm engraving. The right amount depends on the operation, not on maximizing flow.
Using cutting settings for engraving
Airflow suited to a through-cut is often too aggressive for a surface engraving. Match airflow to the operation.
Ignoring manufacturer requirements
Some machines need continuous low airflow for optics protection. Skipping air because 'engraving doesn't need it' can damage optics on those systems.
Confusing air assist with ventilation
Air assist moves smoke at the cut; ventilation removes it from the room. One does not replace the other.
Buying incompatible accessories
A nozzle or pump that fits one machine may not fit or aim correctly on another. Verify compatibility before buying.
Ignoring compressor contamination
Compressors can introduce moisture or oil into the air line, which can damage optics or the workpiece. Use filtration appropriate to the source.
Assuming air assist prevents fires
Airflow may reduce some flare but is not fire suppression. Flammable materials and unattended operation remain dangerous.
Using unknown materials
Some materials produce hazardous fumes or flare unpredictably. Confirm a material is appropriate for your laser before processing it.
Copying settings from another machine
Airflow that works on one laser may be wrong on another with a different nozzle, source, or head design. Use your machine's guidance.
Neglecting nozzle maintenance
A blocked or misaligned nozzle changes airflow at the cut. Inspect and clean nozzles per manufacturer guidance.
Frequently Asked Questions
Final Thoughts
Air assist is a tool for managing conditions at the laser's processing point. Its usefulness depends on the operation, the machine design, the material, the airflow delivery, and the manufacturer's recommendations — not on a single rule like 'always on' or 'always off.'
For through-cutting, appropriate airflow usually helps by clearing the kerf and reducing charring. For engraving, the right approach depends on your machine: some systems want reduced or no air for fine work, while others need continuous low airflow to protect the optics. The difference is why machine-specific guidance matters more than generic advice.
Whatever airflow you use, proper ventilation, careful material selection, and fire precautions remain necessary. Air assist manages the cut; it does not make the air safe or the laser fireproof. Before changing your air-assist configuration, consult your machine's documentation and follow its approved procedures.
Official Documentation Consulted
Official manufacturer support center for xTool laser systems, including air-assist setup and operation guidance.
Official xTool documentation on automatic air-assist control modes for supported systems.
Official xTool troubleshooting guidance addressing air-assist behavior during engraving operations.
Official LightBurn documentation covering air-assist control, layer settings, and machine configuration.
Official OMTech documentation for CO2 and related laser systems, including air-assist configuration.
Keep Reading
- Types of Laser Engravers: Diode vs CO2 vs Fiber
- How Much Laser Power Do You Actually Need?
- Best Laser Engravers for Wood
- Laser Engraving File Formats Explained
- Best Laser Engravers for Beginners
- Laser Engraving & Cutting Hub
- Editorial Policy
Digital Workshop Guide does not claim hands-on testing or ownership of laser equipment unless explicitly stated. Air-assist behavior and recommendations referenced here reflect official manufacturer documentation as of November 2026. Different manufacturers and models recommend different air-assist behavior — verify current guidance for your exact machine, software version, and material before changing any configuration.