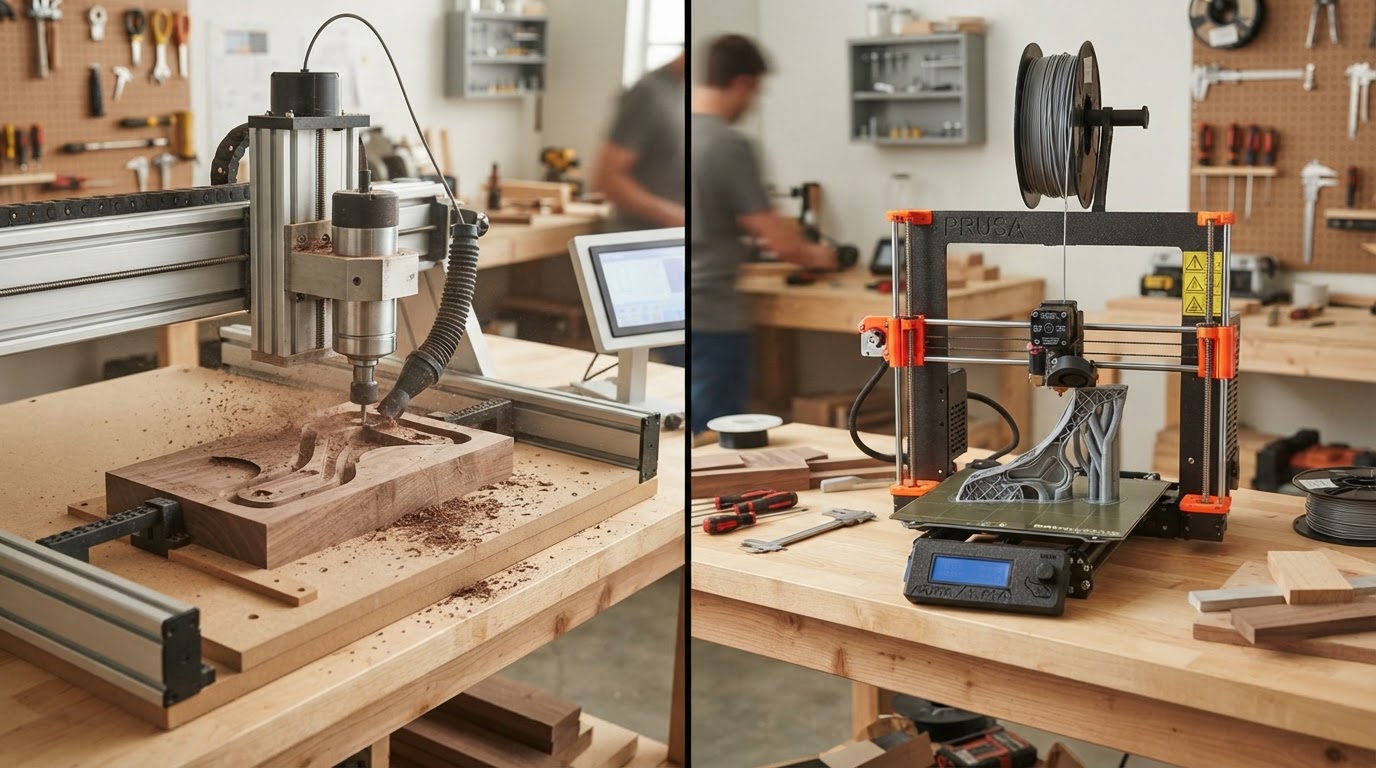
CNC vs. 3D printing comparison
CNC Router vs. 3D Printer: Which One Should You Choose?
CNC routers and 3D printers both turn a digital design into a physical part, and for a maker setting up a first workshop they often compete for the same budget and bench space. That overlap is exactly why the choice is hard.
But they approach manufacturing from opposite directions. A CNC router generally begins with a larger piece of stock and removes what isn't needed. A 3D printer starts with nothing and builds the object up, layer by layer. That single difference cascades into everything that follows: which materials you can use, what geometry is possible, how strong the part is, how much waste you create, and what your workshop needs to handle.
This guide is not about which machine is better. It's about which process is better for the things you actually want to make — and for the space, budget, and learning curve you're willing to take on.
Quick answer
There's no universal winner. The right choice depends on whether your work leans toward flat stock, depth, and the properties of solid material, or toward complex three-dimensional geometry and iterative prototyping.
Lean toward a CNC router if your priorities are more like:
- Wood, plywood, MDF, and sheet goods
- Larger flat components, panels, and signs
- Furniture components, joinery, and pockets
- Dimensional carving and relief
- Machining appropriate nonferrous metals on a capable machine
- Parts where the properties of the original stock material matter
Lean toward a 3D printer if your priorities are more like:
- Complex three-dimensional geometry difficult to machine subtractively
- Prototypes, custom enclosures, brackets, and organizers
- Robotics and electronics parts and mounts
- Models, miniatures, and detailed figures
- Internal passages and enclosed structures
- Low-waste iterative prototyping with little setup
Neither list is absolute. Capability depends on machine rigidity, spindle and tooling, print technology and material, workholding, build volume, and the specific geometry of your project.
Additive vs. subtractive manufacturing
Understanding the fundamental direction each process works explains almost every difference that follows.
CNC router — subtractive
A CNC router starts with a piece of stock — a board, a sheet, a block — and removes material with a rotating cutting tool until the finished geometry remains. What's left is the part; everything else becomes chips and dust.
Because you begin with solid material, the finished part retains the properties of that stock: the grain of hardwood, the uniform structure of cast acrylic, the strength of a continuous piece of metal. The tradeoff is that anything you remove is waste.
- Starts with stock; material is removed to reveal the part
- Finished part retains the properties of the original material
- Removed material becomes chips, dust, and offcuts
- Tool access limits which geometry is reachable
- Workholding is required to resist cutting forces
- Internal features are limited by tool access from outside the part
3D printer — additive
A 3D printer starts with a digital model and deposits or cures material progressively, building the object up layer by layer until it's complete. There's no stock to start from and no chips to clear.
Because material is added only where the part exists, complex and internal geometry becomes possible that would be impossible to reach with a cutting tool. The tradeoff is that the part's properties depend on how it was built — layer orientation, adhesion, and infill all matter.
- Starts from a digital model; material is deposited or cured to build the part
- Complex and internal geometry is achievable
- Little waste from the geometry itself, but supports and failures add up
- Part properties depend on orientation, layer adhesion, and infill
- No workholding needed — the part builds on a bed
- Build volume constrains maximum part size
The subtractive-vs-additive distinction is the root of nearly every other difference: materials, geometry, strength, waste, tooling, and the kind of setup each job requires.
At a glance: CNC router vs. 3D printer
A high-level comparison of the two processes. Every row is qualified — real capability depends on the specific machine, tooling, print technology, material, and setup.
| Factor | CNC router | 3D printer |
|---|---|---|
| Manufacturing method | Subtractive — removes material from stock | Additive — builds material layer by layer |
| Typical materials | Wood, plywood, MDF, plastics, foam, aluminum (capable machine) | FDM filaments (PLA, PETG, ABS/ASA, TPU) and resins |
| Complex geometry | Limited by tool access and 3-axis reach | Strong — internal and complex shapes are achievable |
| Internal geometry | Generally not possible from outside the part | Enclosed passages and internal structures possible |
| Large flat parts | Strong — sheet goods and panels are a natural fit | Limited by build volume |
| Woodworking | Excellent — profiles, pockets, joinery, carving | Not real wood; wood-filled filament is a composite |
| Metal capability | Aluminum on a rigid machine with proper tooling | Not conventional metal manufacturing (desktop) |
| Plastic parts | Machines plastic stock with the right tooling | Creates plastic parts additively (FDM/resin) |
| Functional prototypes | Good when stock properties matter | Excellent for iterating geometry and fit |
| Miniatures / models | Poor fit for fine detailed figures | Excellent (resin especially) |
| Dimensional carving | Strong — pockets, reliefs, 2.5D/3D carving | Limited — primarily builds up, not carves in |
| Material waste | Significant — chips, dust, offcuts | Low from geometry; supports and failures add waste |
| Tooling | Bits, end mills, collets (consumable) | No cutting tools; nozzles/build surfaces wear |
| Workholding | Essential — clamps, tabs, vacuum, fixtures | Not needed — part builds on a bed |
| Support structures | Not used (workholding instead) | Often required for overhangs (removable) |
| Surface finish | Tool marks; sanding and finishing needed | Layer lines (FDM) or finer detail (resin) |
| Noise | Spindle/router and cutting can be loud | Generally quieter motion |
| Dust / fumes | Chips and fine dust; dust collection required | Material-dependent ventilation; resin needs handling |
| Workspace | Dust, noise, rigidity, workholding space | Footprint, filament storage, resin workspace |
| Learning curve | CAD/CAM, tooling, feeds/speeds, workholding | Slicing, materials, supports, orientation |
| Design workflow | CAD → CAM → toolpaths → machining | CAD/model → slicer → print → post-process |
| Maintenance | Bits, collets, spoilboard, rails, dust system | Nozzles, build surfaces, motion, calibration |
| Best suited to | Flat stock, depth, joinery, dimensional parts | Complex geometry, prototypes, models |
“CNC router” capability varies enormously by rigidity, spindle, and tooling; “3D printer” capability varies by print technology (FDM vs. resin) and material. Treat the table as a starting point, not a verdict.
Materials: two different ecosystems
The two processes work with fundamentally different material ecosystems. A printed plastic part is not equivalent to a machined part merely because the dimensions match.
CNC router materials
- Hardwood, plywood, and MDF — the core woodworking materials
- Plastics — acrylic, HDPE, Delrin, and others with appropriate tooling
- Foam — for packaging, prototypes, and models
- Composites and laminates with the right bit and strategy
- Aluminum on a sufficiently rigid machine with proper tooling and speeds
3D printer materials
- FDM: PLA, PETG, ABS/ASA (where setup permits), TPU, and engineering filaments
- Resin: photopolymer resin families tuned for detail, toughness, or flexibility
- Wood-filled and metal-filled filaments exist but are composites, not the real material
- Material properties depend on print orientation and layer adhesion
- Build volume and bed type constrain what's practical
Don't compare a printed PLA bracket to a machined aluminum bracket as if they're interchangeable. They're different materials made by different processes with different properties.
Wood
This is one of the clearest distinctions. A CNC router is fundamentally a woodworking tool; a typical 3D printer does not print real wood.
- Profiles, pockets, and through-cuts in solid wood and sheet goods
- Signs, carvings, and dimensional lettering
- Joinery — rabbets, dados, mortises, and tenons
- Furniture components and cabinetry parts
- Plywood and MDF sheet work
Wood-filled filaments exist, but they are composite printing materials — a blend of plastic and wood powder — and are not equivalent to machining lumber. They can't replace a CNC for structural woodworking, joinery, or furniture components. If your work is primarily wood, a CNC router is the right tool.
Read the Desktop CNC Routers for Beginners guide
Plastics
Plastics are where the two technologies overlap. Both can produce plastic parts, but the path and the resulting part differ.
CNC on plastics
- Machines solid plastic stock with the right bit and feeds
- Retains the uniform properties of cast or extruded stock
- Edges need finishing; melting is a risk if speeds are wrong
- Workholding is required to prevent chatter and cracking
- Suitable for dimensional features and larger flat parts
3D printing plastics
- Creates plastic parts additively from filament or resin
- Geometry can be complex and internal without tool-access limits
- FDM parts are anisotropic — layer orientation affects strength
- Little setup per part; good for iteration
- Surface finish shows layer lines (FDM) or finer detail (resin)
A machined plastic part keeps the properties of the stock it came from. A printed plastic part's properties depend on how it was built. Neither is universally stronger — it depends on the material, orientation, and load.
Metal
This section needs care. Sweeping claims about either process and metal are misleading without context.
Typical desktop FDM and resin printers are not conventional metal-manufacturing machines. Metal-filled filament is a composite — plastic mixed with metal powder — and is not the same as printing a solid metal part. Specialized industrial metal additive manufacturing exists, but it's outside the typical desktop buyer comparison.
Likewise, not every CNC router is appropriate for metal machining. Aluminum is machinable on a sufficiently rigid router with the right bits, slow speeds, light cuts, and often coolant — but a light desktop router will struggle regardless of process.
So in the consumer/prosumer comparison, metal removal generally leans CNC — but only on a machine built for it. A printed metal-filled part is decorative at best, not a structural metal component.
Read the Best CNC Routers for Aluminum guide
Part strength
Don't accept a blanket claim that “CNC parts are stronger.” Strength depends on the base material, geometry, and — for printed parts — how they were built.
CNC
- A machined part retains the properties of the stock material, subject to its geometry
- Grain and fiber structure of the original material are preserved
- No layer-based anisotropy — the part is continuous material
- Strength depends on material selection, geometry, and machining quality
3D printing
- FDM parts can be anisotropic — layer orientation affects strength
- Layer adhesion, infill, and wall thickness all matter
- Resin parts can be strong and detailed but are also orientation-dependent
- Printed parts can be entirely appropriate for many functional applications
A CNC-machined aluminum bracket and a 3D-printed PLA bracket are not the same part. Match the material and process to the load the part will actually see. For many low-load applications a well-oriented printed part is perfectly adequate; for high loads or specific material properties, machining the right stock is often the better answer.
Geometric complexity
This is a major 3D-printing advantage. Additive manufacturing can create geometry that would be difficult or impossible on a basic 3-axis CNC router.
3D printing
- Internal passages and enclosed structures
- Complex curves and organic shapes
- Lightweight lattice and infill structures
- Integrated assemblies and assemblies-in-one
- Geometry unreachable by a cutting tool from outside the part
CNC
- Tool-access limitations — a bit can only reach from outside the part
- Cutter diameter sets the minimum inside-corner radius
- Inside corners are rounded (limited by bit radius)
- Setup and orientation limit what's machinable in one operation
If your part has internal channels, enclosed cavities, or complex curves, 3D printing is often the only practical option. If your part is flat, pocketed, or dimensional, a CNC handles it well.
Size
The two processes are constrained in opposite ways.
CNC
A CNC router is particularly attractive for sheet goods, panels, signs, and larger flat components. The work area sets the maximum single-piece size, but sheet stock can be large and parts can be long within the machine's envelope.
3D printing
A 3D printer is constrained by its build volume — the bounding box of what it can produce in one piece. Within that envelope it can create complex volumetric objects efficiently, but parts larger than the build volume require splitting, printing in sections, and assembly.
Avoid universal dimensions — work areas and build volumes vary widely. If your projects are large flat panels, a CNC is the natural fit. If they're complex objects within a modest volume, a 3D printer handles them well.
Accuracy, precision, and tolerances
Don't simply declare one more accurate. Accuracy and visual detail are different requirements, and each process has its own variables.
CNC
- Accuracy depends on rigidity, backlash, and spindle/tool runout
- Tooling, workholding, feeds/speeds, and calibration all matter
- Creates highly controlled physical dimensions and depths
- Tool diameter limits the smallest feature and inside corner
3D printing
- Accuracy depends on calibration, material behavior, and shrinkage
- Layer height, extrusion, and resin exposure affect dimensional control
- Orientation affects how dimensions land in each axis
- Resin can hold finer detail than FDM in many cases
A CNC may create more controlled physical dimensions and depth; a 3D printer may create finer visual detail in complex geometry. Know whether your project needs dimensional control or visual detail — they're not the same requirement.
Surface finish
Each process leaves its own signature on the surface.
CNC surface finish
- Tool marks follow the toolpath and stepover
- Sanding and finishing are usually required for a smooth surface
- Machining strategy (climb vs. conventional, stepover) affects finish
- Different bits leave different patterns — ball nose for smooth curves
3D-printed surface finish
- FDM: visible layer lines, especially on sloped surfaces
- Orientation affects which faces show layer lines
- Sanding, priming, and finishing smooth FDM parts
- Resin: finer detail with fewer visible layers, but support marks remain
Neither process produces a finished surface straight off the machine. Both often need post-processing. Resin generally achieves the finest detail; CNC achieves the most controlled flat and contoured surfaces.
Waste
Additive manufacturing can reduce material waste for some geometries — but it's not waste-free.
CNC
CNC creates chips, dust, removed stock, and offcuts. Anything not part of the finished geometry is removed and becomes waste, though offcuts can sometimes be reused.
3D printing
3D printing uses material only where the part exists, but supports, failed prints, purge material, test pieces, and resin-handling consumables all add waste. Resin in particular generates disposable gloves, filters, and cleaning waste.
For a part that's mostly solid within a block of stock, CNC wastes a lot. For a complex lightweight part, 3D printing wastes little. Neither is free of waste — compare the whole workflow, not just the finished part.
Speed
No blanket winner. Speed depends heavily on the job and the machine.
- Flat profiles and sheet components: A CNC can cut profiles and pockets through sheet goods efficiently once set up.
- Deep material removal: CNC removes real volume; deep pockets take multiple passes and time.
- Complex geometry: A 3D printer builds complex shapes in one unattended run where a CNC would need multiple setups.
- Iterating prototypes: 3D printing shines when you're changing the model frequently — little setup per revision.
- Repeated parts: Both can batch parts; CNC may need re-zeroing or workholding changes between setups.
- Setup time vs. machine time: CNC setup (workholding, zeroing, tooling) can dominate short jobs; 3D printing setup (slicing, bed prep) is often quicker but machine time can be long.
For a quick prototype of a complex part, 3D printing is often faster end-to-end. For a run of flat components, a CNC is often faster once it's set up. Compare total time, not just machine time.
Design workflow
The workflows differ in structure, and the conceptual difference between CAM toolpath planning and slicing is worth understanding.
CNC workflow
- Design the part in CAD or vector software
- Generate toolpaths in CAM (tools, feeds, speeds, depth)
- Select and install the right bit
- Secure the workpiece and set zero
- Run the toolpath and supervise the cut
3D-printing workflow
- Create or import the model (CAD or a model library)
- Slice the model (orientation, supports, infill, layer height)
- Prepare the machine (bed, filament/resin)
- Print, often unattended
- Post-process (remove supports, sand, wash/cure resin)
CAM is about planning how a tool removes material; slicing is about planning how material is added. Both translate a digital model into machine instructions, but the planning problems are different.
Learning curve
Both have a learning curve, but the shape of it differs.
CNC concepts to learn
- Tooling — bit types, geometry, and selection
- Feeds and speeds for each material and bit
- Workholding and zeroing
- Toolpaths and depth-of-cut strategy
- CAM software workflow
3D-printing concepts to learn
- Slicing — orientation, supports, infill, layer height
- Materials and their behavior
- Bed/build-surface considerations and adhesion
- Print failures and how to diagnose them
- Basic maintenance and calibration
Modern machines simplify both. CNC isn't impossibly complicated, and 3D printing isn't push-button. But CNC introduces more setup variables (tooling, workholding, feeds and speeds), while 3D printing introduces material and slicing variables. Neither is beyond a motivated beginner.
Workspace
Real ownership requirements differ, and your space may decide the question for you.
CNC workspace
- Dust collection is essential — routing makes chips and fine dust
- Spindle/router and cutting noise can be significant
- Workholding takes space and planning (clamps, tabs, vacuum)
- Rigidity needs a solid mounting surface
- Physical debris needs management
FDM workspace
- Machine footprint is modest; fits a desk or bench
- Filament storage (dry, sealed) matters for material quality
- Ventilation considerations depend on material (ABS/ASA more than PLA)
- Heat and moving machinery — keep the area clear
- Generally less debris than a CNC
Resin workspace
- Liquid chemical workflow — handling and spill planning
- Ventilation and workspace planning for fumes
- Washing and curing stations take additional space
- PPE (gloves) and consumables
- Light-sensitive storage for resin and cured parts
Someone in an apartment may find an enclosed FDM printer more workable than a dusty, noisy CNC. Someone in a garage or dedicated workshop has room for either. Resin adds a chemical-handling workflow that needs its own planning. Neither process is inherently safe indoors without appropriate controls.
Noise, dust, fumes, and mess
A direct comparison of the biggest environmental tradeoffs.
CNC
Significant mechanical and spindle noise plus chips and fine dust. Dust collection is essential, and noise control matters if you share walls with neighbors.
FDM
Generally less debris than a CNC, but material-specific ventilation considerations remain — ABS and ASA emit fumes and odors that should be managed. PLA is comparatively mild but still benefits from ventilation.
Resin
A liquid chemical workflow with washing, curing, and handling requirements. Resin fumes, spills, and disposable consumables need ventilation, PPE, and a planned workspace.
If you can't manage dust and noise, a CNC is hard to live with. If you can't manage fumes or chemical handling, resin is hard to live with. FDM is often the most apartment-friendly, but still needs ventilation for some materials.
Maintenance
Typical maintenance categories — not universal schedules.
CNC maintenance
- Cutting tools — inspect and replace bits and end mills
- Collets and tool holders
- Spoilboard — surface or replace
- Rails, leadscrews, and motion system
- Dust collection and spindle/router
- General machine cleaning and lubrication
3D-printer maintenance
- Nozzles — inspect, clean, and replace
- Build surfaces — clean and replace when worn
- Motion system — belts, rods, wheels
- Filament path and extruder
- Calibration and bed leveling
- Resin vat and release film where applicable
Cost of ownership
Compare more than sticker price. Each process has its own ongoing costs.
CNC ownership costs
- Machine purchase
- Tooling — bits, end mills, collets
- Workholding — clamps, tabs, vacuum
- Dust collection
- Material (stock)
- Software where applicable and routine maintenance
3D-printer ownership costs
- Machine purchase
- Filament or resin (ongoing material)
- Accessories — build surfaces, nozzles, dryers
- Replacement parts
- Drying/storage where relevant
- Washing/curing equipment for resin
- Failed prints and routine maintenance
Sticker price alone is misleading. A cheap machine that needs constant troubleshooting costs more in time than a more capable one. The same is true in reverse — price doesn't automatically equal reliability.
- Read the How Much Does a CNC Router Cost? guide
- Read the How Much Does a 3D Printer Cost? guide
- Read the 3D Printer Accessories guide
Prototyping
“Prototype” doesn't automatically mean 3D printing. The right choice depends on what the prototype needs to prove.
3D printing
- Iterating geometry quickly with little setup per revision
- Testing fit and assembly of complex shapes
- Producing enclosures, brackets, and mounts
- Making complex shapes that would be hard to machine
- Rapidly changing the digital model between versions
CNC
- When the final material's properties matter to the test
- When the prototype must reflect the production machining process
- Flat or pocketed components where stock behavior is the point
- When you need the actual material, not a plastic approximation
If you're iterating form and fit, 3D printing is usually faster. If you're testing a material property or a production process, machining the real stock is often more representative.
Jigs, fixtures, and workshop tools
This is an important overlap. Both technologies can make the workshop more capable by producing jigs, fixtures, and aids.
- Both can create jigs, fixtures, holders, templates, and assembly aids
- Choose based on material, size, load, geometry, and required durability
- A CNC excels for wooden jigs, templates, and fixtures that take load
- A 3D printer excels for custom brackets, organizers, and complex-shaped aids
- Printed dust-collection adapters and mounts are a common workshop use
Many makers use a 3D printer specifically to produce workshop tooling — custom adapters, cable clips, sensor mounts, and dust-collection fittings — that would be tedious to machine. A CNC is the better choice for wooden jigs and fixtures that need to survive clamping and cutting forces.
Small business use
Both processes support real business models — but different ones. Owning equipment does not create demand.
CNC-friendly business models
- Signs and dimensional lettering
- Furniture components and cabinetry parts
- Carved products and decorative panels
- Jigs, fixtures, and templates (for sale or production)
- Custom parts from sheet goods
3D-printing-friendly business models
- Prototypes and product development
- Custom accessories and replacement parts
- Models and miniatures
- Specialized low-volume components
- Custom enclosures and mounts
Market demand and your production workflow matter more than simply owning the machine. The right process is the one that matches what your customers actually buy.
Project-by-project decision table
A practical lens: for each common project, which process is the better fit and why. These are general guidance, not absolute machine specifications.
| Project | CNC router | 3D printer | Why |
|---|---|---|---|
| Wooden sign | Excellent | Poor fit | Real wood signs with depth and carving require a CNC. |
| Furniture component | Excellent | Poor fit | Pockets, profiles, and joinery need a CNC. |
| Custom electronics enclosure | Possible | Excellent | Complex internal geometry favors 3D printing. |
| Robot bracket | Possible | Excellent | Complex mounting geometry iterates fast on a printer. |
| Miniature figure | Poor fit | Excellent (resin) | Fine detailed figures are a resin-printing strength. |
| Workshop jig | Excellent | Good | Wooden load-bearing jigs favor a CNC; complex aids favor printing. |
| Drawer organizer | Good | Excellent | Custom compartment geometry iterates fast on a printer. |
| Replacement knob | Possible | Excellent | A custom-shaped knob is quick to print and fit. |
| Aluminum bracket | Good (rigid machine) | Poor fit (desktop) | Metal removal generally requires a capable CNC. |
| Wooden pocketed tray | Excellent | Poor fit | Pockets and recessed cavities require a CNC. |
| Prototype housing | Good | Excellent | Iterating fit and form favors 3D printing. |
| Large plywood panel | Excellent | Poor fit | Sheet work at scale is a CNC strength. |
| Custom adapter | Possible | Excellent | Complex mating geometry is quick to print. |
| Terrain / model piece | Possible | Excellent | Organic complex geometry favors 3D printing. |
| Dimensional carving | Excellent | Poor fit | Relief and 3D carving require a CNC. |
| Complex internal geometry | Poor fit | Excellent | Internal passages are only practical additively. |
“Excellent,” “Good,” “Possible,” and “Poor fit” are general guidance, not guarantees. Real results depend on the specific machine, tooling, print technology, material, and setup.
Which one for beginners?
Don't automatically assume a 3D printer is the right first machine. The answer depends on what someone wants to make.
- Interested in woodworking — lean CNC. If your projects are signs, furniture parts, joinery, or carvings, a CNC router is the tool that actually does that work.
- Interested in electronics, design, or prototyping — lean 3D printer. If your projects are enclosures, brackets, mounts, and complex shapes, a 3D printer matches the work.
- Not sure what you want to make yet — lean Define projects first. Before buying either machine, name the things you realistically want to produce. The project list usually answers the question for you.
Which one should you buy first?
A practical decision framework. Work through these questions honestly before choosing.
Questions to work through
- What do I actually want to make?
- Which material will I use most?
- Are my projects mostly flat or dimensional stock, or complex volumetric objects?
- Do I work primarily with wood?
- Do I need complex plastic parts?
- Do I need pockets or joinery?
- Do I need internal geometry?
- What workspace do I have?
- Can I handle CNC noise and dust?
- Am I comfortable with 3D-printing material and workflow requirements?
- What size are my projects?
- Do I need the properties of stock material?
Conditional recommendations
- Mostly wood, signs, and furniture components: A CNC router sized to your typical part and rigidity needs.
- Mostly complex plastic parts, enclosures, and prototypes: A 3D printer — FDM for general parts, resin for fine detail.
- Mostly flat sheet work and panels: A CNC router with a work area that fits your sheet stock.
- Mostly miniatures and detailed figures: A resin 3D printer for fine detail.
- Mostly aluminum or metal: A rigid, capable CNC — and verify it's built for soft-metal work.
- A mix of both, with budget for one: Start with whichever covers more of your realistic project list; add the other later.
When you may want both
CNC routers and 3D printers can complement each other rather than compete.
A maker might CNC-machine a wooden enclosure or fixture and then 3D-print the internal mounts, brackets, and cable management that fit inside it. The two processes do different jobs on the same project.
Or a 3D-printed prototype can validate a design before committing expensive stock to a CNC machining operation — printing first to test fit, then machining the final part in the real material.
Examples
- CNC a wooden enclosure, then print the internal mounts and brackets
- Print a prototype to test fit, then CNC the final part in solid stock
- CNC a machine fixture, then print a positioning accessory that fits it
- Print dust-collection adapters and mounts for your CNC and other workshop tools
- CNC furniture components, then print custom templates and jigs for assembly
This doesn't mean everyone needs both. But if your work spans dimensional wood parts and complex plastic components, the two tools cover ground the other can't.
Also considering a laser cutter?
If you're weighing a laser cutter alongside a CNC router or 3D printer, our Laser Cutter vs. CNC Router comparison covers the non-contact, light-based process and how it differs from subtractive machining.
Read the Laser Cutter vs. CNC Router guide
Frequently Asked Questions
Keep reading
- CNC Routers hub
- 3D Printing hub
- Best CNC Routers
- How Much Does a CNC Router Cost?
- Desktop CNC Routers for Beginners
- Best CNC Routers for Aluminum
- Best 3D Printers
- 3D Printers for Beginners
- How Much Does a 3D Printer Cost?
- FDM vs. Resin 3D Printing
- Are 3D Printers Worth It?
- Laser Cutter vs. CNC Router
- CNC Mill vs. CNC Router
Digital Workshop Guide does not claim hands-on testing or ownership of equipment unless explicitly stated. This comparison is based on the documented principles of subtractive and additive manufacturing, manufacturer specifications, and general process fundamentals — not on independent performance measurements, production-speed benchmarks, or survey results. Machine-specific capability depends on machine rigidity, tooling, print technology, material, and setup.